Numark Mixtrack Platinum FX
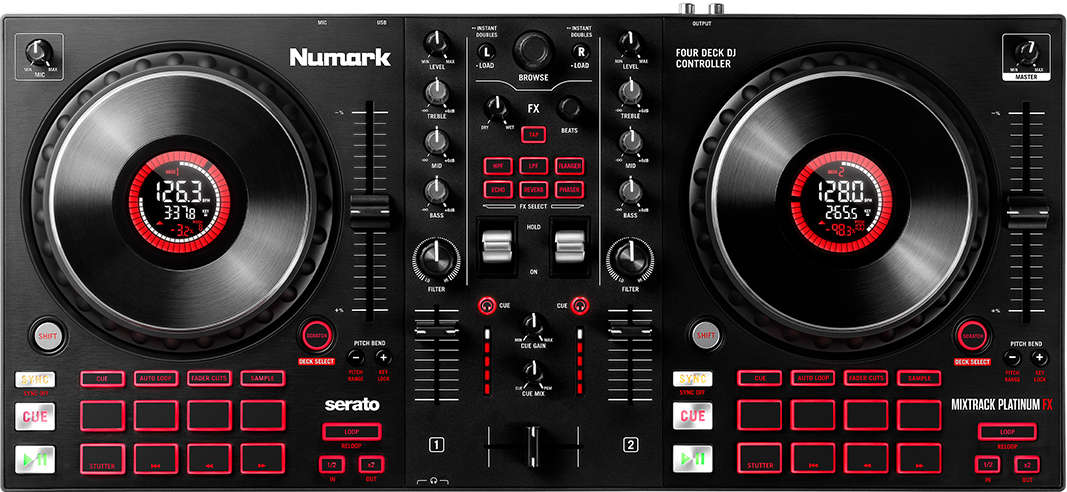
The Mixtrack Platinum FX is a 24-bit 4-deck digital DJ controller with a dedicated software effects section, large 6-inch capacitive-touch jog wheels and 16-multifunctional performance pads. Its stand out feature is the LCD displays integrated into the jog wheels, apart from that it shares the layout of the Mixtrack Pro FX.
It is a USB Audio and MIDI Class compliant device and works with Linux, macOS, and Windows.
Firmware
The mapping requires the following Firmware for all enabled features to work for Mixxx 2.4
Linux users need to install firmware using Windows or MAC.
Audio Interface
Configure Mixxx’ Main output for channels 1-2 and Headphones output for Channels 3-4.
The microphone input on this controller is not available to the computer through the controller’s audio interface. It is mixed with the master output in hardware, so this controller’s audio interface is not suitable for broadcasting or recording the inputs. If you want to use the controller for broadcasting or recording, a separate audio interface with a microphone input is suggested.
Control Mapping

No. |
Control |
Function |
|---|---|---|
1 |
Browse Rotate |
Cycle through folders and tracks |
Press |
Cycle between the Crates and Library |
|
SHIFT Rotate |
Fast Scrolling |
|
Left SHIFT Press |
Open/Close Directory |
|
Right SHIFT Press |
Preview Play/Stop Track |
|
2 |
Master Gain |
Adjusts the master volume in the software. |
3 |
Mic Gain |
Adjusts the level for the microphone input. |
4 |
Cue Mix |
Adjusts the audio output to the headphones, mixing between the cue output and the master mix output. |
5 |
Cue Gain |
Adjusts the volume for headphone cueing. |
SHIFT Global Sample Volume Adjust |
Adjusts volume on all sample decks |
|
6 |
Master Output LEDs |
Displays the audio level going to the Master Output. |
7 |
Load |
Press one of these buttons while a track is selected to assign it to Deck 1 or 2, respectively. |
2X Press Track Cloning |
Quickly double press a Load button to clone the track of the adjacent deck. |
|
SHIFT Eject |
Removes the track from related deck. |
|
8 |
Level |
Adjusts the pre-fader, pre-EQ audio level of the corresponding channel. |
9 |
High EQ |
Controls the treble frequencies for the individual channels |
10 |
Mid EQ |
Controls the mid-range frequencies for the individual channels. |
11 |
Low EQ |
Controls the bass frequencies for the individual channels. |
12 |
Filter |
Adjusts the amount of the filter effect. Turning the knob left and right will produce a lowpass filter and high-pass filter, respectively. |
13 |
Cue/PFL |
Sends pre-fader audio to the cue channel forheadphone monitoring. |
SHIFT Slip Mode |
Toggles slip mode on/off for related deck. |
|
14 |
Channel Fader |
Adjusts the volume of the individual channels in the software. |
15 |
Crossfader |
Controls the blend between the two decks |
16 |
Pitch Bend Down |
Press and hold to momentarily reduce the speed of the track. |
SHIFT Pitch Range |
Hold Shift and this djust Pitch Range |
|
17 |
Pitch Bend Up |
Press and hold to momentarily reduce the speed of the track. |
SHIFT Keylock |
Hold Shift and this button to adjust Keylock. |
|
18 |
Pitch Fader |
This controls the speed of the music. Moving towards the + will speed the music up, while moving towards the – will slow it down. |
19 |
Beats Multiplier |
Increases and decreases the rate of the effects to the beat. When using a time-based effect, this knob adjusts its time division. |
SHIFT FX Macros |
Selects and controls FX Macros parameters. |
|
20 |
FX Wet/Dry Knob |
Turn this knob to adjust the wet/dry mix of the effects. |
21 |
Software FX |
Press one of these buttons to select the user assigned software effect.
• HPF (High pass filter)
• LPF (Low pass filter)
• Flanger
• Echo
• Reverb
• Phaser
FX Buttons will need to be assigned with mixxx Effects selectors in the graphical interface.
|
SHIFT Multiple FX (at once) |
Hold shift and select/unselect multiple FX buttons to be active at once. |
|
22 |
FX Toggle On / Off: |
Push up on the toggle switch to latch (lock) the FX in the on position. Push down on the toggle switch to turn the FX on momentarily. When the toggle switch is in the middle position, the FX will be off. |
23 |
Tap BPM |
Press this a minimum of 4 times to manually enter a new BPM. The software will ignore the track’s BPM and follow your manually entered tempo.
See Tapping Logic
|
Left PFL ON (Right off) |
Set BPM for left deck.
See Tapping Logic
|
|
Right PFL ON (Left off) |
Set BPM for right deck.
See Tapping Logic
|
|
SHIFT Default Tempo Reset |
Press Shift and this button to reset the tempo to the track to default BPM.
Note: Reset the selected deck. See Tapping Logic
|
|
24 |
Platter/Jog Wheel |
This capacitive, touch-sensitive jog wheel controls the audio when the wheel is touched and moved. When the Scratch button is not active, use the jog wheel to bend the pitch of the track. When the Scratch button is active, use the jog wheel to grab and move the audio, scratching the track as you would with a vinyl record. You can also grab the non-touch-sensitive outer wheel, to bend the pitch of the track. |
SHIFT Scrub Scroll |
Scrub Scrolling while holding Jog wheel. |
|
25 |
Deck Display |
1. Active Deck: Indicates the currently active deck.
2. Platter Position: Displays the current track position.
3. BPM: Displays the current BPM for the selected track.
4. Keylock: This icon illuminates when keylock is active for the current deck.
5. Pitch Range: Shows the current pitch range.
6. Pitch: Shows current pitch of the track.
7. Pitch Adjust: Indicates the direction to move Pitch Fader to match the current track’s BPM with the track on the opposite deck.
8. Time Remaining: Displays the time elapsed or time remaining for the current track. (Time elapsed only implemented in current mapping).
9. Time Bars: Provides visual reference to time remaining on the selected song. When the song is almost over these segments will flash to give a warning.
|
26 |
Scratch |
Press this button to turn on the scratch feature for the jog wheel. |
SHIFT Deck Select |
Switch between decks 1 & 3 or 2 & 4 for 4 deck mixing |
|
27 |
Shift |
Allows multiple control commands to be triggered when pressed first along with other buttons. |
28 |
Sync (tap) |
Automatically match the corresponding Deck’s tempo with the opposite Deck’s tempo. |
Lock Sync (hold) |
Hold for at least one second to lock sync. Tap again to release sync lock. |
|
SHIFT Quantize |
Toggle quantize on/off. |
|
29 |
Cue (tap) |
Sets and recalls the main Cue point in the current track |
Cue Play (hold) |
Play from the Cue point for as long as the button is held down and return to the cue point once it is released |
|
SHIFT Cue Track Start |
Return cue head to beginning of track. |
|
30 |
Play/Pause |
Starts and suspends playback. |
SHIFT Beat Grid Adjust |
Adjust Beat Grid, Hold shift and this button to align closest beat to the current play position. |
|
31 |
Cue (Pad) |
With this Pad mode, each pad assigns a Hot Cue Point, or returns the track to that Hot Cue Point. When a pad is unlit, you can assign a Hot Cue Point by pressing it at the desired point in your track.
|
SHIFT Secondary Hot Cue |
Hot Cue 9-16 |
|
HOLD or 2X PRESS
Beat Jump
|
Beat Jump |
|
32 |
Auto Loop (Pad) |
With this Pad mode, each pad triggers an auto loop of a different length.
|
SHIFT Beat Jump |
Roll Loop |
|
HOLD or 2X PRESS
Beat Jump
|
Cue Loop |
|
33 |
Fader Cuts (Pad) |
With this Pad mode, the top 4 performance pads are used to perform transform effects for cuts on scratching.
|
SHIFT Roll |
Each pad triggers a roll of a different length |
|
Hold or double-press
Fader Cuts 3rd set
|
Fader Cuts Roll Rev, Key Tempo |
|
34 |
Sampler 1-8 (Pad) |
With this Pad mode, each pad triggers a sample in the software.
|
SHIFT Sampler 9-16 |
Selects layer 2 of samples - Performance pads then trigger samples 9-16. |
|
Hold or double-press
Pitch Play
|
Pitch Play |
|
35 |
Performance Pads |
The pads are used to trigger loop points or samples depending on the Pad mode setting.
|
36 |
Loop On/Off |
Press to activate auto loop on/off. |
SHIFT Re-Loop |
Triggers a re-loop |
|
37 |
Loop 1/2 |
Press this button when a loop is active to decrease the loop size by half.
|
SHIFT Loop In (Manual Loop) |
Set the Loop In point for a manual loop. |
|
38 |
Loop x2 |
Press this button when a loop is active to double the loop size. |
SHIFT Loop Out (Manual Loop) |
Set the Loop Out point for a manual loop. |
Performance Pad Modes
The pads are for controlling cue’s, loops, and samples via various modes. To select a mode, select a Pad Mode button (Cue, Auto Loop, Fader Cuts & Sample) to assign that functionality to the 8 pads. An LED under the pad, indicates the currently selected mode.
Further to the NORMAL Pad Mode, 2 additional layers of functionality, SHIFT & ALTERNATE is also provided, as shown in the matrix below.
Function |
Mode |
Cue |
Auto Loop |
Fader Cuts |
Samples |
|---|---|---|---|---|---|
Normal |
Primary
• (LED On)
|
Hot Cue 1-8 |
Auto Loop |
Fader Cuts Transport |
Sample 1-8 |
SHIFT |
Secondary Mode
• (LED Slow Blink)
|
Hot Cue 9-16 |
Roll Loop |
Fader Cuts 8 |
Sample 9-16 |
Hold or 2X PRESS |
Alternative Mode
• (LED Fast Blink)
|
Beat Jump |
Cue Loop |
Fader Cuts Roll Rev, Key Tempo |
Pitch Play |
NOTE: Within these modes initiated by SHIFT, the SHIFT button can be further used as an action or function for the individual pads.
Pad Loop Lengths
Pad 1 |
Pad 2 |
Pad 3 |
Pad 4 |
|---|---|---|---|
1 beat |
2 beat |
4 beat |
8 beat |
Cue Mode & Layers
Mode |
Pad Function |
Shift function |
|---|---|---|
Normal
|
Cue Pad 1-8 Each pad assigns a Hot Cue Point, or returns the track to that Hot Cue Point. When a pad is unlit, you can assign a Hot Cue Point by pressing it at the desired point in your track. |
Remove Cue Hold and selecting pad, removes that cue point. |
SHIFT Secondary Mode
|
Cue 9-16 Same as Normal mode |
Remove Cue Hold and selecting pad, removes that cue point. |
Hold or 2X PRESS Alternative Mode
|
Beat Jump Lets you move forwards in a track in predefined pad beat increments while staying in sync and on time. See Pad Loop Lengths |
Reverse Beat Jump Holding and selecting pad, let’s you move backwards in a track in predefined pad beat increments while staying in sync and on time See Pad Loop Lengths |
Auto Loop Mode & Layers
Mode |
Pad Function |
Shift function |
|---|---|---|
Normal
|
Auto Loop8 Activates a loop section of pre-determined pad beat lengths, which loops automatically. |
Roll Loop (Hold shift) Hold and selecting pad, performs a standard Auto Loop, but when the loop is turned off the playback position is returned to the position where it would be, if it had not entered the loop. |
SHIFT Secondary Mode
|
Roll Loop (Hold shift) Performs a standard Auto Loop, but when the loop is turned off the playback position is returned to the position where it would be, if it had not entered the loop. |
Auto Loop Hold and selecting pad, Activates a loop section of pre-determined pad beat lengths, which loops automatically. |
Hold or 2X PRESS Alternative Mode
|
Cue Loop Pressing the button jumps to the relative hot cue (1-8) and activates a loop (the same length as if the loop button was pressed). TIP: Adjust loop length with dedicated loop controls half or double. |
Cue Loop Roll & Slip Hold and selecting pad, additionally activates slip mode, and does a roll at the cue point, then releasing the button, resumes where it would have been. |
Fader Cuts Mode & Layers
Mode |
Pad Function |
Shift (as Pad Action) |
|---|---|---|
Normal
|
Fader Cuts (Pad 1-4) The pads will mute and unmute the deck’s audio signal in a way that emulates crossfader movements toward that deck. (P1-4) Standard Fader Cuts (Click Flares) (P5-8) Factory Functions P5 – Stutter / Repeat P6 – Start / Previous Track P7 – Rewind P8 – Fast Forward |
Note: Shift + Pad Mode buttons, puts decks into an alternate pad layer. In that layer shift can be further used as an pad action for the individual pads. |
SHIFT Secondary Mode
|
(P1-4) Standard Fader Cuts (P5-8) Extended Fader Cuts |
|
Hold or 2X PRESS Alternative Mode
|
(P1-4) Standard Fader Cuts (P5) – Reverse Roll (Censor) (P6) – Reverse Toggle (Censor) (P7) – Key sync to deck (P8) – Tap Tempo. |
(P5-8) Various Fader Cuts (P7) – Reset Key sync (P8) – Reset Tap Tempo. |
Sample Mode & Layers
Mode |
Pad Function |
Shift function |
|---|---|---|
Normal
|
(P1-8) Play Sample |
Stop Playback/Load Sample Hold and selecting pad, Stop Playback or Load Sample if the slot is empty. |
SHIFT Secondary Mode
|
(P9-16) Play Sample |
Stop Playback/Load Sample Hold and selecting pad, Stop Playback or Load Sample if the slot is empty. |
Hold or 2X PRESS Alternative Mode
|
Pitch Play (P1-4) Play a single cue Point at variable pitches. Note
|
Change Range Hold and selecting SAMPLE, changes Range 3 ranges. Change cue Hold and selecting other cue point on Cue Pad changes cue. |
Tapping
Logic for the tap button:
If only one deck is loaded, the BPM control will be assigned to the loaded deck.
If both decks are loaded (only 1 PFL ON):
One deck with active PFL, the BPM button will be assigned to the deck with active PFL.
If both deck is loaded (Both PFL on the same state):
The BPM button will be assigned to the deck the is playing.
If both deck are playing, then BPM will control the deck with the lowest deck number
Note: BPM only controls the active deck To help know which it is using when tapping BOTH up and down arrows on the deck are lit. As the first tap doesn’t make any changes (you can’t work out a bpm from one tap) it is safe to tap and hold the button and check which deck the arrows are showing on.
PADS
The pads are for controlling cues, loops, and samples via various modes & layers. To select a mode, select a Pad Mode button (Cue, Auto Loop, Fader Cuts & Sample) to assign that functionality to the 8 pads. An LED under the pad section indicates the currently selected